Buying Guide
Scope Mounting Tools and Rings: What You Actually Need
Almost every optic that will not hold zero was mounted by feel. Rings tightened with a screwdriver and a guess are either loose enough to creep or tight enough to crush the tube, and both problems look identical from behind the glass. The fix is about eighty dollars of equipment and twenty minutes.
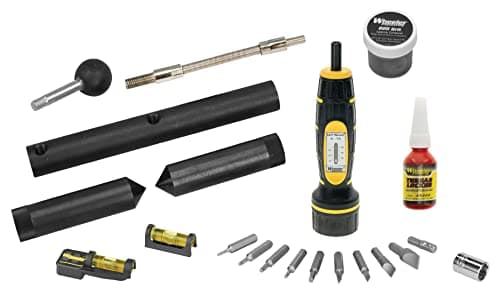
A scope that will not hold zero is almost never a scope problem. It is a mounting problem, and there are only three ways to create one: screws that are too loose, screws that are too tight, and a reticle that is not level with the rifle.
All three are solved with equipment rather than skill. Vortex publishes 15 to 18 inch-pounds for ring cap screws and warns explicitly that exceeding it can crimp the scope tube and restrict the internal erector assembly - a figure nobody hits reliably by hand. Their mounting guide is equally blunt about what else you need: a sturdy bench with a vise, hand tools that actually fit the fasteners, a torque wrench, and, in their words, "a small bubble-level - better yet, a few small bubble-levels."
This page covers that equipment. It is a hardware guide only - we do not link firearms or ammunition anywhere on this site, and nothing here is a substitute for your scope and mount manufacturer's own documentation, which always takes precedence over general figures.
Why mounting by feel fails
Three specific failure modes, and what each one looks like at the range:
- Under-torqued rings. The scope creeps backward in the rings under recoil. The symptom is a zero that walks in one direction over a session and a scope whose position relative to the rings has visibly changed. People blame the scope.
- Over-torqued rings. The tube is squeezed out of round, which binds the internal erector tube. The symptoms are adjustments that do not track - you dial four clicks and get two - or a reticle that will not return to zero after a box test. People also blame the scope.
- Canted reticle.The crosshair is not square with the rifle's vertical axis. At close range this is invisible; as distance grows the impact drifts laterally, because your elevation dial is no longer moving straight up.
What is actually required, and what is optional
| Tool | Required? | What it does |
|---|---|---|
| Torque driver (inch-pound) | Required | Hits the manufacturer's ring and base figures exactly |
| Bubble levels (two or three) | Required | Levels the rifle, then squares the reticle to it |
| A vise or solid rest | Required | Holds the rifle still and level while you work |
| Correct bits (Torx and hex) | Required | Prevents rounding out ring screws |
| Reticle leveling system | Strongly recommended | Removes the guesswork from squaring the reticle |
| Ring alignment bars | Optional | Reveals misaligned rings before the scope goes in |
| Lapping kit | Optional | Increases ring-to-tube contact on cheaper two-piece mounts |
| Laser bore sighter | Optional | Gets you close on paper before live fire |
Torque drivers and the numbers that matter
There are two different torque figures in a scope mount and people routinely apply the wrong one to the wrong screws.
- Ring cap screws - the ones that clamp around the scope tube. Vortex specifies 15 to 18 inch-pounds. This is the low number, and it is the one that damages scopes when exceeded.
- Ring-to-base or base-to-receiver screws- the ones holding the mount to the rifle. These take substantially more. Vortex's own mounting guide notes that most rings are held secure between 35 and 45 inch-pounds when securing the rings to the base.
Always check your specific ring and scope manufacturer's documentation - these figures vary by product, and the manufacturer's number wins over any general guidance, including ours.
Levels and reticle leveling systems
Leveling is a two-stage job and it is where most home mounts go wrong. First you level the rifle - a bubble level on a genuinely flat reference surface, with the rifle held in a vise. Then you level the reticle to the already-level rifle, using a second level on the elevation turret cap surface.
The failure mode is doing it by eye against a doorframe. The human visual system is good at detecting vertical lines and bad at detecting a two-degree cant, and two degrees is enough to matter past 300 yards.
A dedicated reticle leveling system replaces the second bubble with a reference bar that registers against the scope, which removes the question of whether the turret cap surface is actually square to the reticle. It is not required, and it is the single biggest convenience upgrade in the process.
Ring alignment and lapping: who needs it
Lapping means running an abrasive compound between an alignment bar and the ring interior to increase the percentage of ring surface actually contacting the scope tube. More contact area means the clamping force is spread rather than concentrated, which reduces ring marks and tube stress.
Honest assessment of who needs it:
- Worth doing: inexpensive two-piece rings on an older receiver with drilled-and-tapped bases, where machining tolerances stack up.
- Usually unnecessary: a modern one-piece cantilever mount or a matched precision ring set on a Picatinny rail. These are machined as a unit and are typically already aligned.
- Do not do it: on rings with a corrosion-resistant coating you would be grinding through, or if you are not confident about removing material from a part.
The alignment bars alone - used without compound - are the more broadly useful half of these kits: they show you whether the rings point at the same place before you put a scope between them.
Rings and bases: the four families
| Type | How it mounts | Best for |
|---|---|---|
| Picatinny / Weaver rings | Clamp to a rail with a recoil lug in a slot | The modern default; most flexible for eye relief |
| Integral base-and-ring (Talley style) | One piece, bolts directly to receiver holes | Lightweight hunting rifles; fewest interfaces to loosen |
| Quick-detach rings | Lever clamps to a rail, removable and returnable | Hunters who swap optics or carry backup irons |
| One-piece cantilever mounts | Single unit spanning the rail, tube held forward | Setups needing extra forward eye relief |
Ring height is the specification people get wrong. Buy the lowest ring height that lets the objective bell clear the barrel with a business card's gap, and that lets the eyepiece clear the rear of the action when adjusting eye relief. Too high forces an unnatural cheek position; too low means the scope physically will not mount.
The tools at a glance
| Tool | Role | Buy it if |
|---|---|---|
| Wheeler Scope Mounting Kit | Complete kit | You are starting from nothing |
| Wheeler FAT Wrench | Torque driver | You already own levels and bits |
| Reticle Leveling System | Leveling | You mount more than one scope a year |
| Level-Level-Level | Leveling | You want the cheapest correct answer |
| Alignment and lapping kit | Ring prep | You run two-piece rings on an older action |
Best complete kit: Wheeler Scope Mounting Kit
The 1-inch kit bundles a manual FAT Wrench, the Level-Level-Level system and alignment bars in a storage case. It is the efficient way to buy in, because the individual tools bought separately cost more than the kit and you will use all of them in the same twenty minutes.
Check the tube diameter before ordering - the kits are sold in 1-inch and 30mm versions because the alignment bars are diameter-specific, and 30mm is now the more common tube size on new hunting scopes.
Wheeler Scope Mounting Combo Kit
The combo covers both 1-inch and 30mm rings with alignment and lapping bars for each, plus the FAT Wrench. Buy this one if you have more than one rifle, or if you expect to mount scopes for other people, which is how these tools usually end up being used.
Wheeler FAT Wrench, manual and digital
The FAT Wrench is the standard inch-pound driver in this category. The manual version has an adjustable clutch you set with a dial; the digital version reads out the applied torque on a screen, which is useful if you are working at several different values in one session.
For most hunters the manual is the right buy - it is simpler, has no batteries, and hitting a set value repeatedly is exactly what it is for.
Wheeler Professional Reticle Leveling System
A reference bar that clamps to the rail and a level that registers on the scope, so the reticle is squared to the rifle rather than to whatever you were eyeballing. If you mount more than one scope a year this pays for itself in eliminated do-overs.
Budget levels
The Wheeler Level-Level-Level is a magnetic-base bubble level that costs almost nothing and covers both stages of the leveling job if you are patient. The WarBull universal kit is the cheap version of the full leveling system, with a magnetic base and reference wedges.
Neither is as fast or as certain as the dedicated system, and both are enormously better than eyeballing it.
Wheeler alignment and lapping kits
Sold in 1-inch and 30mm versions with alignment bars, a lapping bar and compound. As covered above, the alignment bars are the part most people benefit from; lapping is a targeted fix for a specific problem, not a routine step.
The Real Avid leveling kit and the Wheeler Ultra kit are the higher-end all-in-one options if you want a torque driver, leveling system and bore sighter in one purchase.
Rings worth buying
Rings are one of the few places in optics where the cheap option is genuinely a bad idea, because the ring is what transmits recoil into your scope tube. Four families worth considering:
- Vortex Pro Series rings - the sensible default for a Picatinny rail, available in several heights, at a price that makes sense on a hunting rifle.
- Vortex Precision Matched Rings - machined as a matched pair for tighter alignment; the option if you are not going to lap.
- Warne Maxima - steel construction with a square recoil key and Torx hardware, which is a more secure interface than a slotted screw on a hard-recoiling rifle.
- Talley Lightweight - integral one-piece alloy ring and base that bolts straight to receiver holes. Fewest interfaces, lowest weight, and a favorite on mountain rifles for exactly that reason.
Ring fit is model-specific. Confirm the tube diameter, the ring height and the base pattern against your rifle and scope before ordering.
The order of operations
Vortex's published sequence is the one to follow, and the order matters - doing eye relief after leveling means undoing the leveling:
- Secure the rings or base to the rail at the manufacturer's figure.
- Set the scope in the rings at highest magnification and set eye relief by shouldering the rifle in a natural head position until you get a full sight picture.
- Level the rifle in the vise using a flat reference surface.
- Level the reticle to the now-level rifle.
- Tighten the ring cap screws incrementally in a cross pattern, a little at a time, to the manufacturer's figure - Vortex specifies about 15 to 18 inch-pounds - with no thread locker.
Then check everything again after the first range session and again after the first hunt. Fasteners settle.
Four mistakes that cost people zero
- Using thread locker on ring caps. It lubricates the threads, so your torque reading is met before the actual clamping force is right - and you end up over clamped.
- Tightening one screw fully before the others. Ring caps must be brought down evenly, in a cross pattern, in small increments, so the gap on each side stays equal.
- Using the wrong bit. A slightly undersized hex or Torx bit rounds the screw head, and a rounded ring screw is a genuinely miserable thing to remove.
- Setting eye relief at low magnification. Eye relief shortens as magnification increases on most variable scopes, so set it at maximum power and it will be comfortable everywhere.
If you are setting up a crossbow rather than a rifle, see our crossbow sight-in guide and how to read a crossbow scope.
Frequently asked questions
How tight should scope rings be?
Follow the manufacturer's published figure for your specific rings and scope. Vortex specifies 15 to 18 inch-pounds for riflescope ring cap screws and warns that exceeding it can crimp the scope tube and restrict internal components, affecting dialing range and zero retention. Ring-to-base screws take considerably more - Vortex notes most rings are held secure between 35 and 45 inch-pounds at that interface. These are not values you can reach reliably by hand, which is why a torque driver is the one tool worth buying.
Do you need a torque wrench to mount a scope?
Practically, yes. The consequences of guessing run in both directions: too loose and the scope creeps under recoil so your zero walks; too tight and you distort the tube, which binds the erector assembly and makes adjustments stop tracking. Both problems present as a scope that will not hold zero, which is why they usually get blamed on the optic. An inch-pound driver removes the guess entirely for about the cost of one range trip.
Should I use Loctite on scope ring screws?
Not on ring cap screws. Vortex states plainly that thread-locking compounds should not be used because they act as a lubricant, which causes you to over-torque the ring while the wrench still reads the correct value. Base-to-receiver screws are a different case and some manufacturers do specify a thread locker there - follow the specific instructions that came with your mount.
Do scope rings need to be lapped?
Usually not. Lapping is a targeted fix for inexpensive two-piece rings on an older receiver where machining tolerances stack up and the two rings do not quite align. A modern one-piece cantilever mount or a matched precision ring set on a Picatinny rail is machined as a unit and is typically already aligned. The alignment bars from a lapping kit are broadly useful on their own, because they show whether the rings point at the same place before a scope goes between them.
How do you level a scope reticle without a leveling system?
Level the rifle first with a bubble level on a genuinely flat reference surface while it is held in a vise, then place a second small level across the flat surface of the elevation turret cap and rotate the scope until that reads level too. This works, and it is what most people do. A dedicated reticle leveling system replaces the second step with a reference bar that registers against the scope itself, removing the assumption that the turret cap surface is perfectly square to the reticle.
Sources
- Vortex Optics - how to torque your riflescope rings (recommends 15 to 18 in-lbs for riflescope rings; states DO NOT use a thread locking compound because these compounds act as a lubricant, causing over-torquing; warns excessive torque can permanently damage the scope tube through crimping and can restrict internal mechanical and optical components, limiting dialing range and affecting zero retention)
- Vortex Optics - how to properly mount a riflescope (required tools: a well-lit sturdy bench with a gun vise, quality hand tools matching the fasteners, a torque wrench, and small bubble-levels; sequence of securing rings to base at 35-45 inch pounds, installing the optic at highest magnification, establishing eye relief, leveling the rifle, leveling the reticle, then incrementally torquing ring screws to about 15-18 in-lbs without thread-locker)
- Amazon product catalog - live availability, current pricing, size and diameter options, and product images verified for every tool and ring set listed on this page (checked 2026-09-06)
Keep reading
Gearing up before your next hunt?
See how we evaluate gear, then dig into the reviews and buying guides — written without inventory to sell.