How-To Guide
How to Sharpen a Broadhead
Sharpening a fixed-blade broadhead is a 20-to-25-degree angle, a progression of abrasives, and one trick with a permanent marker that stops you grinding one bevel into the other. Mechanical blades are a different answer entirely: you replace them.
Set your abrasive to 20 to 25 degrees for a straight-edge head, colour both bevels with a permanent marker, then work each side with even strokes through progressively finer abrasives — 320 or 400 grit, then 600, 1500 and 2000 — until the marker is gone and the edge cuts a stretched rubber band without pressure. That is the whole procedure. The marker is what keeps it honest.
One thing to settle before you start, because it decides whether this page applies to you at all: most mechanical broadheads are not meant to be sharpened. Their blades are consumable and sold in replacement packs. The heads worth sharpening are fixed-blade heads and traditional heads — and they will take an edge better than almost anything else in your pack.
First: is your head even sharpenable?
| Fixed-blade heads | Yes. This is what broadhead sharpening means. Replaceable-blade fixed heads can be either sharpened or re-bladed - your choice. |
|---|---|
| Traditional / single-bevel heads | Yes, and they are the heads most often sharpened by hand. Single-bevel heads need a one-sided technique - see below. |
| Mechanical heads | No, as a rule. The blades are thin, consumable and sold in replacement packs; a sharpened mechanical blade can also sit differently in the ferrule, which is a deployment problem, not just an edge problem. |
| Any head that has hit bone or steel | Inspect before sharpening. A bent blade, a cracked ferrule or a chipped tip is a retirement, not a sharpening job - and a damaged arrow or head should never be shot. |
The angle
| Edge type | Sharpening angle | How to recognize it |
|---|---|---|
| Straight edge | 20 to 25 degrees | The bevel is a flat plane from edge to blade body - most modern fixed heads |
| Convex edge | About 25 to 30 degrees | The bevel curves; often found on heavier traditional heads |
| Single bevel | One side only, at the head's own angle | Only one face is ground; the other is flat |
The angle matters less than holding it consistently. This is the entire argument for a jig or a guided sharpener: a 22-degree bevel that is the same on every stroke beats a 20-degree bevel that wanders to 30 and back.
What you need
You can sharpen a broadhead with a jig and wet/dry sandpaper, with a dedicated broadhead jig, or with a mill file for a quick field touch-up — a 10 to 12 inch bastard file for home work, 6 to 8 inch for the pack. The common thread is that all three hold or imply an angle.
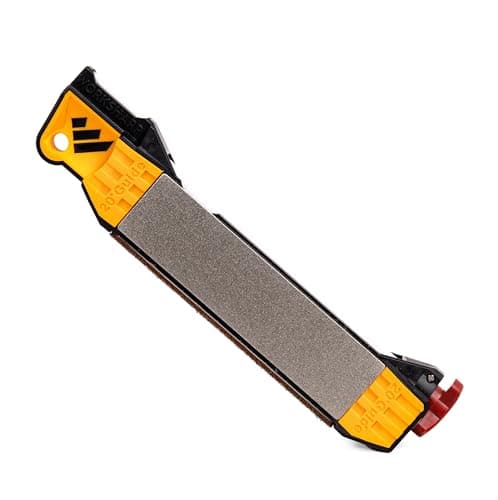
Work Sharp Guided Field Sharpener — who it is for: anyone who wants one tool for broadheads and knives. It carries five abrasive steps in a single self-contained unit (coarse and fine diamond plates, coarse and fine ceramic rods, dual ceramic rods for serrations and a leather strop) with built-in 20 and 25 degree angle guides— which happen to be exactly the window a straight-edge broadhead wants — and the version many bowhunters buy has a broadhead-specific groove. Honest con: the small abrasive surfaces make resetting a badly damaged edge slow compared with a bench stone or a dedicated jig.
Work Sharp Pocket Knife Sharpener — who it is for: the hunter who wants to touch up a head mid-trip.Small enough to live in a pack pocket permanently, which is the point — an edge maintained a little at a time never gets dull enough to need a full session. Honest con: it is a maintenance tool, not a restoration tool.
The sharpening sequence, step by step
| 1. Dismount or secure the head | Work on the head alone, or on an arrow clamped so it cannot roll. A broadhead that turns under pressure is how people get cut. |
|---|---|
| 2. Colour both bevels with a permanent marker | This is your progress gauge for the whole job. Where the marker is gone, you have removed metal; where it remains, you have not touched the steel. |
| 3. Start coarse, but only as coarse as needed | 320 or 400 grit if the edge is genuinely dull or nicked. If the head is only tired, start at 600 - every coarse pass is metal you never get back. |
| 4. Even strokes, both sides, counted | Smooth strokes at your chosen angle, the same number per side. Counting is how a multi-blade head stays symmetrical when you cannot see the edge well. |
| 5. Decrease pressure as you refine | Heavy pressure sets the bevel; light pressure polishes it. Keep lightening as you climb through 600, 1500 and 2000 grit. |
| 6. Finish by stropping | A few light passes on leather removes the burr the abrasives leave. This is the step that separates 'sharp' from 'shaving sharp'. |
The marker trick for even bevels
Colour the bevel with a permanent marker before you start, and work the bevel against the abrasive until the marker is gone. It is the only cheap way to see what your strokes are actually doing.
Read it like this. Marker gone evenly across the bevel means your angle matches the head’s. Marker left behind at the very edge means you are riding too high and polishing the shoulder instead of sharpening the edge. Marker left at the shoulder with a clean edge means you are too low and will round the bevel over if you keep going.
How to test the edge without cutting yourself
Bowhunter education courses use a test built out of rubber bands stretched across a small wooden frame: if the broadhead cuts the bands easily, it is sharp. It is a good test for two reasons — it needs almost no pressure, and it fails honestly. A head that pushes a rubber band aside rather than parting it is not ready to hunt with, however impressive it looks.
What not to do: run a thumb across the edge, or shave a patch of arm hair with a four-bladed head. A broadhead that passes the rubber-band test is sharp enough to open a finger before you feel it.
Single-bevel heads are different
A single-bevel head is ground on one face only, and that asymmetry is the whole design — it is what makes the arrow rotate on impact. Sharpen it as the maker ground it: work only the bevelled face at the head’s existing angle, and do no more than deburr the flat side.
Putting a second bevel on the flat face is the one mistake that cannot be undone. You will have a sharp head that no longer does the thing you bought it for.
When to stop sharpening and buy new
Sharpening is maintenance, not repair. Retire a head when the tip is chipped, a blade is bent or cracked, the ferrule shows a crack, or the blade has been ground back far enough that the profile has changed shape. CenterPoint’s own arrow-safety guidance is blunt about the principle: never shoot an arrow with any sign of damage, and inspect before every use.
And if you would simply rather hunt with factory edges, that is a reasonable position. Who the Trocar HBX is for:the hunter who wants a fixed cutting tip leading the cut — a solid-steel chisel tip with two fixed 1-inch blades and a 1.625-inch mechanical cut behind them — without taking on a sharpening habit. The fixed portion can be touched up; the mechanical blades are replaced.
Keeping hunting heads sharp between seasons
Most broadhead edges are not lost to use. They are lost to a quiver rattling in a truck, a damp basement, and being screwed into and out of shafts. Three habits fix nearly all of it: keep hunting heads in their original case rather than loose in a quiver during the off season, wipe them dry after a wet sit, and keep practice heads and hunting heads physically separate so the sharp ones never meet a target mat.
Then check them in the week before the opener instead of the night before. A touch-up at 2000 grit takes minutes; a full reset at 320 takes an evening and costs you metal.
Frequently asked questions
What angle do you sharpen a broadhead at?
20 to 25 degrees for a straight-edge head, and roughly 25 to 30 degrees for a convex edge. Consistency matters more than the exact figure: a 22-degree bevel held on every stroke beats a 20-degree bevel that wanders. Guided sharpeners and broadhead jigs exist precisely to hold the angle for you - the Work Sharp Guided Field Sharpener has 20 and 25 degree guides built into the body.
Can you sharpen a mechanical broadhead?
Generally no, and you should not plan to. Mechanical blades are thin, consumable and sold in replacement packs, and a sharpened blade can sit differently in the ferrule, which turns an edge question into a deployment question. Sharpen fixed-blade and traditional heads; replace mechanical blades.
What is the best way to sharpen a broadhead?
A jig or guided sharpener plus a progression of abrasives. Colour both bevels with a permanent marker, start at 320 or 400 grit only if the edge is genuinely dull, then work through 600, 1500 and 2000 with even counted strokes per side and decreasing pressure, and finish on a leather strop. The marker tells you when each stage is done: when it is gone, you have reached the steel evenly.
Can you sharpen a broadhead with a file?
Yes, and it is the traditional field method. An 8-inch mill file will touch up heads of most styles; for smooth stock removal a bastard file of 10 to 12 inches is recommended at home and 6 to 8 inches in the pack. A file is a setting tool rather than a finishing tool - follow it with finer abrasives and a strop if you want a shaving edge.
How do you test if a broadhead is sharp enough to hunt with?
Use the rubber-band test taught in bowhunter education courses: stretch rubber bands across a small wooden frame and draw the head across them. If it parts them easily with almost no pressure, it is sharp. Do not test a broadhead on your thumb or by shaving hair - a properly sharpened head will cut you before you feel it.
How often should you sharpen hunting broadheads?
Check them before every season and after anything that touched bone, steel or a target. In practice most edges are lost to storage and handling rather than to shooting, so the useful habit is a quick touch-up at fine grit in the week before the opener, with hunting heads kept in their case and separated from practice heads year-round.
Should you sharpen a single-bevel broadhead on both sides?
No. Work only the bevelled face at the head's existing angle and do no more than remove the burr from the flat side. The one-sided grind is what makes a single-bevel head rotate on impact, and putting a second bevel on the flat face permanently removes that behaviour.
Sources
- Grand View Outdoors - an effective and simple system for sharpening fixed-blade broadheads: a sharpening jig plus wet/dry sandpaper, starting at 320 or 400 grit depending on dullness and working through 600, 1500 and 2000, with smooth even strokes on both sides and decreasing pressure; the permanent-marker trick for symmetrical bevels
- Grizzly Stik - how to sharpen single-bevel broadheads: 20 to 25 degrees for straight-edge broadheads and about 25 to 30 degrees for convex-edge broadheads
- Field & Stream - keeping the sharpest edges on broadheads: an 8-inch mill file for touching up broadheads of all styles, with 10-12 inch bastard files for home sharpening and 6-8 inch for the field; the rubber-band-on-a-frame sharpness test used in bowhunter education courses
- Work Sharp Guided Field Sharpener (WSGFS221) published specifications - five abrasive steps with coarse and fine diamond plates, coarse and fine ceramic rods, dual ceramic rods for serrations and a leather strop; built-in 20 and 25 degree angle guides; coarse 220-600 and fine 1000-3000 grit
- CenterPoint Archery - arrow and bolt safety: never use an arrow with any sign of damage; inspection procedure before use
- Prices, product images and stock status via the Amazon price layer, refreshed daily
Keep reading
Gearing up before your next hunt?
See how we evaluate gear, then dig into the reviews and buying guides — written without inventory to sell.